How to Manage Domains in App Platform
Validated on 30 Apr 2021 • Last edited on 6 Feb 2026
App Platform is a fully managed Platform-as-a-Service (PaaS) that deploys applications from Git repositories or container images. It automatically builds, deploys, and scales components while handling all underlying infrastructure.
After a successful deployment, App Platform assigns a starter domain on ondigitalocean.app. You can add a custom domain to map a domain you own to the app. For example, you can add example.com and update your DNS configuration to route traffic to the app.
You can also edit the app spec to redirect traffic from the starter domain to your custom domain.
App Platform offers two public ingress IPs that you can target with DNS records to direct traffic to your app, free of charge. For more details, see How to Add Static IP Addresses to App Platform Components.
App Platform does not support adding DNSSEC-enabled domains to apps.
Add a Domain to an App Using Automation
You can add a domain to an app using the CLI’s app update command or the API’s app update endpoint. To add a domain, update the app spec with the domain’s specifications and submit the spec using the following command or endpoint. The app spec must completely define all of your app’s configurations. We recommend downloading your current app spec from the control panel, API, or CLI, and modifying it to include the domain.
Add a Domain Using the Control Panel
To add a custom domain, go to the Apps page, click your app, then click the Networking tab. In the Domains section, click Add domain.
On the Add domain screen, enter your custom domain name in the Domain field.
Under Management options, choose one of the following:
- We manage your domain: DigitalOcean manages DNS using its nameservers.
- You manage your domain: your DNS provider manages DNS using a CNAME pointer.
Option 1: Use DigitalOcean’s Nameservers
If you choose We manage your domain, copy DigitalOcean’s nameservers and paste them into your domain registrar’s nameserver settings:
ns1.digitalocean.com
ns2.digitalocean.com
ns3.digitalocean.com
See Point to DigitalOcean Name Servers From Common Domain Registrars for instructions with popular registrars.
Click Add domain to complete the setup.
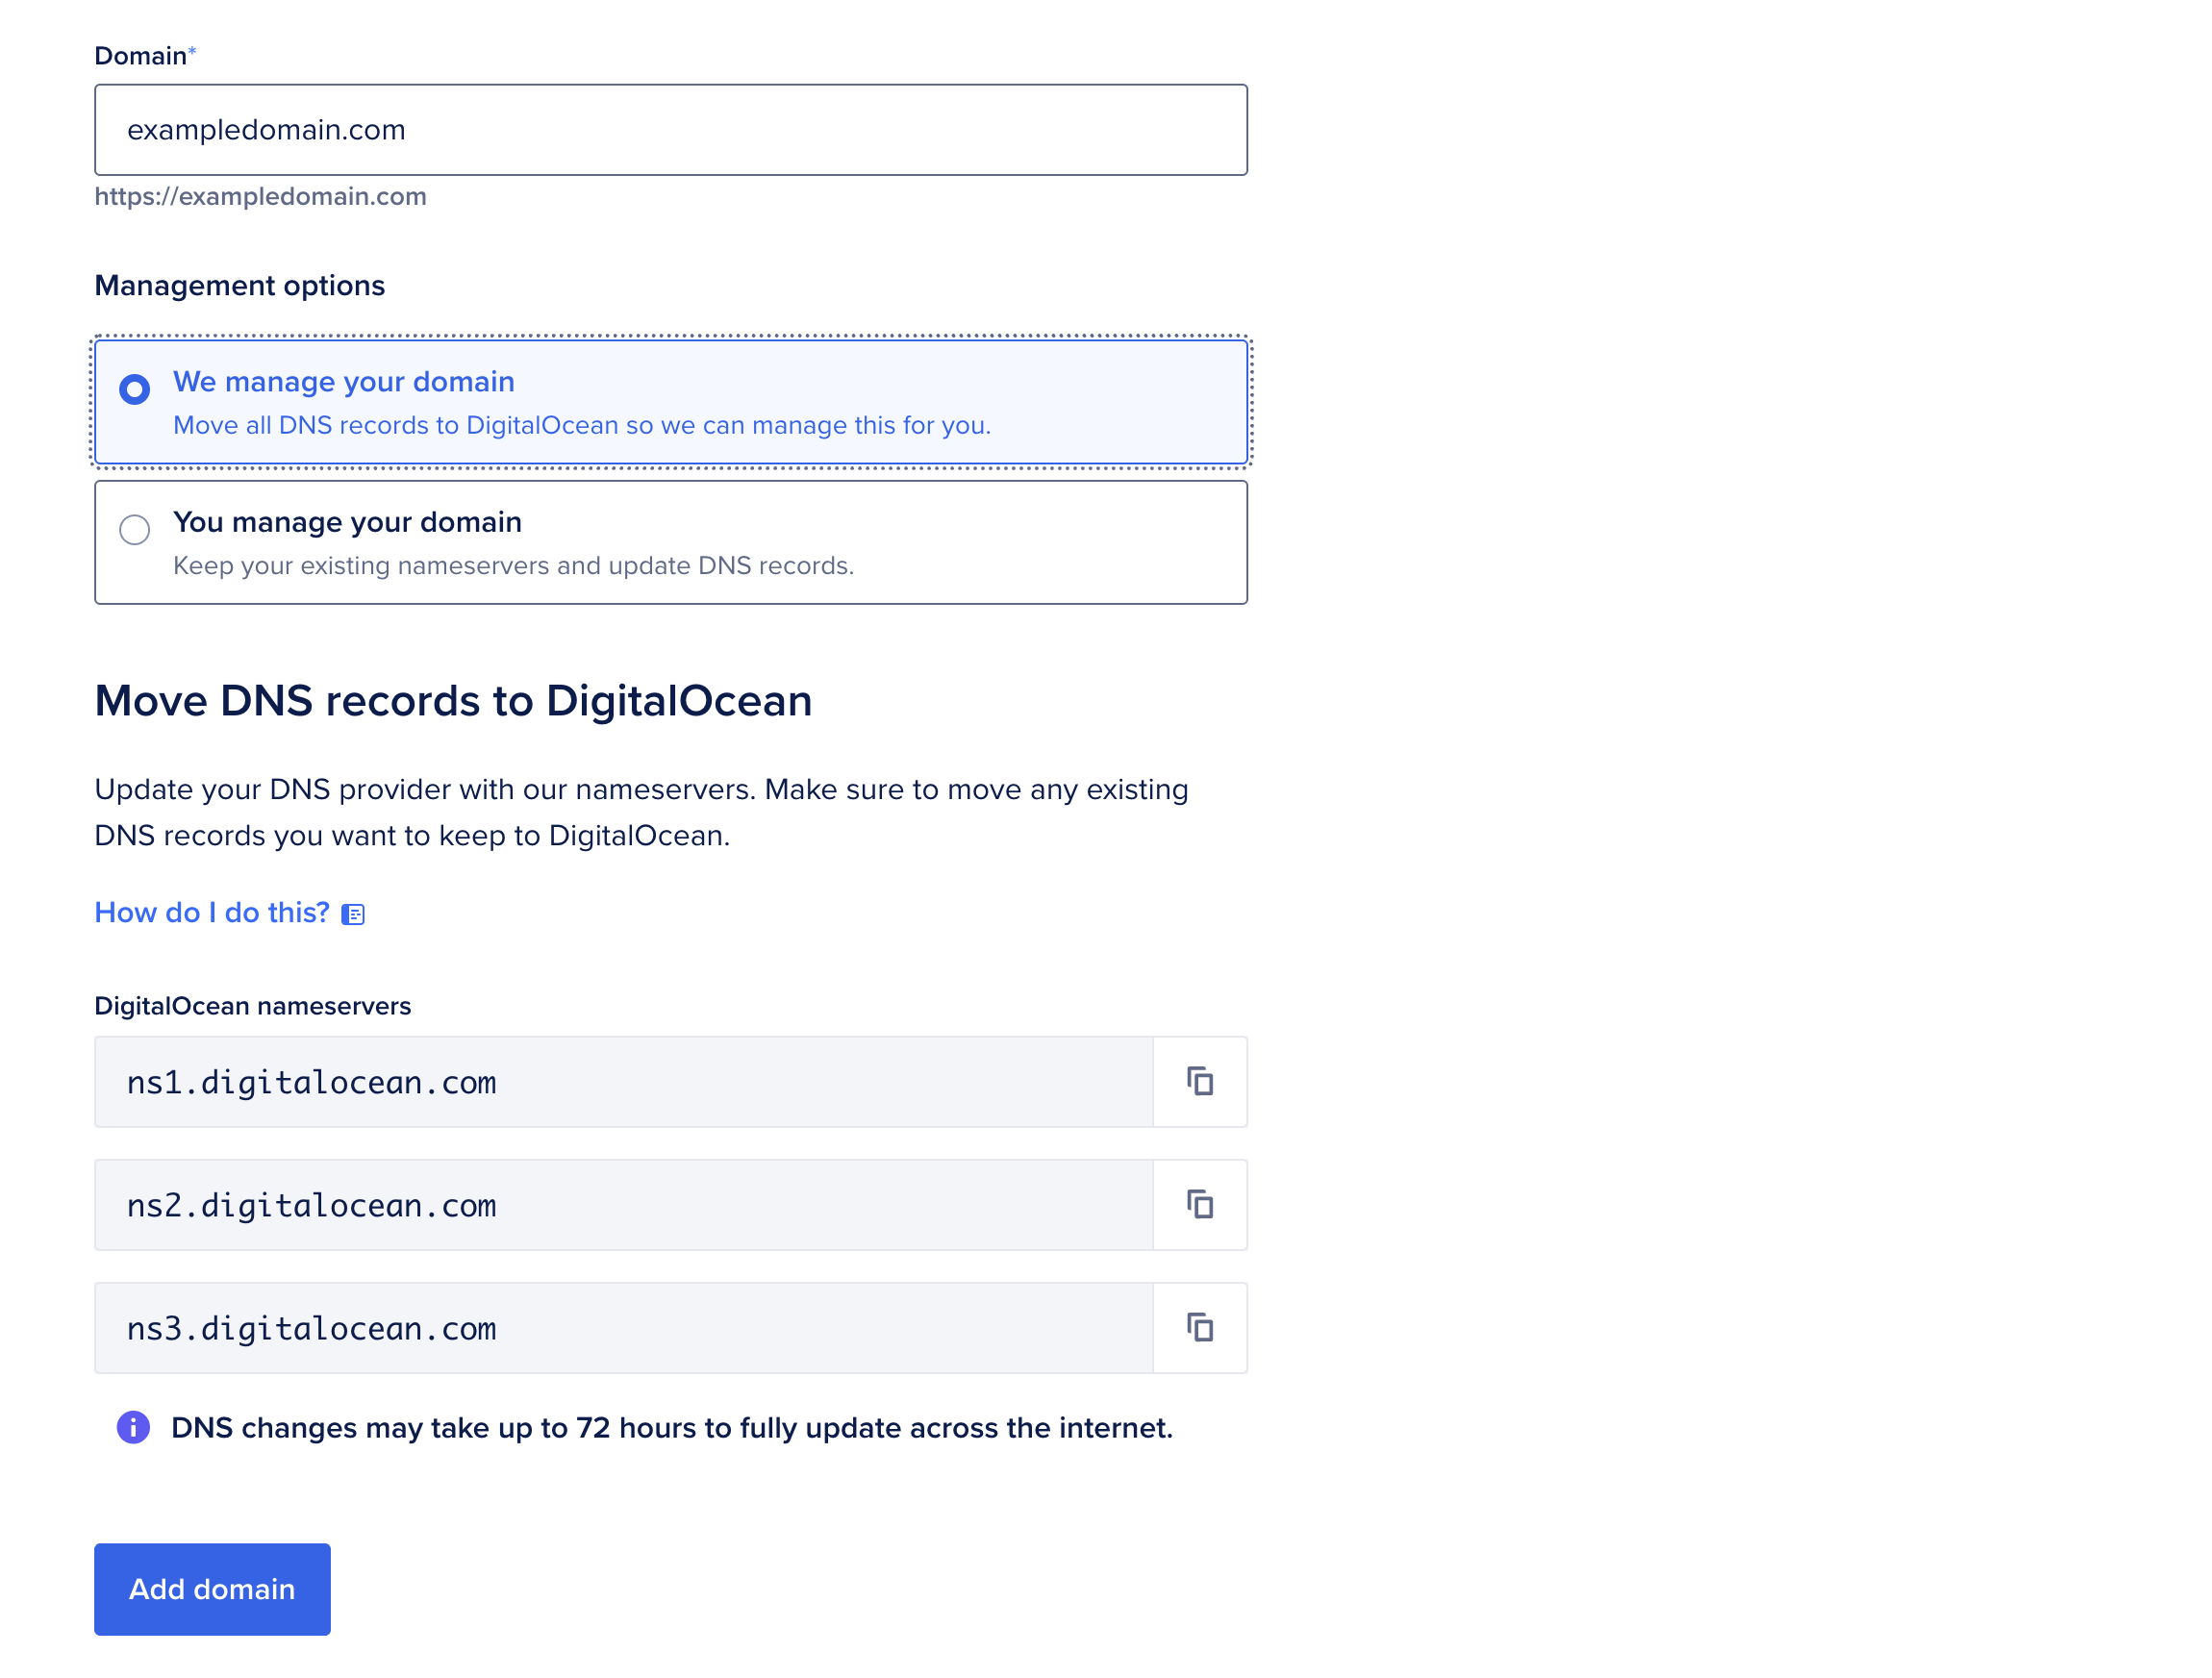
DNS changes can take up to 72 hours to propagate. You can track progress in the App Platform dashboard.
Option 2: Use a CNAME Alias
If you choose You manage your domain, copy the displayed CNAME alias ending in ondigitalocean.app and add a CNAME record with your DNS provider pointing your custom domain to the alias.
If your DNS provider is not DigitalOcean, reference your DNS provider’s documentation for instructions. If your DNS provider does not support CNAME flattening at the root domain, App Platform provides A records you can use instead.
After you configure the CNAME alias (or A records), click Add domain to complete the setup.

DNS changes can take up to 72 hours to propagate. You can track progress in the App Platform dashboard.
Add a Wildcard Domain
A wildcard DNS record (*.example.com) catches requests for subdomains that don’t have their own DNS records. For example, support.example.com would resolve to the same resource as example.com. After adding a root domain in App Platform, you can add a wildcard domain to cover subdomains, or an apex wildcard domain to cover both the apex and all subdomains.
To add a wildcard record, go to the Apps page, click your app, then click the Networking tab. In the Domains section, click Add domain.
On the Add domain screen, in the Domain field, enter your wildcard domain (for example, *.example.com).
Under Management options, choose one of the following:
- We manage your domain. If the root domain’s DNS was already configured, no further configuration is required. Click Add domain to finish.
- You manage your domain. Copy the displayed CNAME alias, and then add a wildcard CNAME record in your DNS provider. Set the host to
*and the target to the CNAME alias you copied (for example,* → example-1abcd.ondigitalocean.app). Click Add domain to finish.
Wildcard domains require additional verification for certificate issuance. App Platform issues certificates using TXT verification tokens.
To verify the wildcard domain, go to the Domains section of the Networking tab and click Use TXT records to verify under the wildcard domain you added. Copy the TXT record names and values, then add the TXT records in your DNS provider.
App Platform sends notifications in the control panel and by email 30 days before tokens expire. To re-verify the domain, add the updated TXT records in your DNS provider.
DNS changes can take up to 72 hours to propagate. You can track progress in the App Platform dashboard.
Change Domain Management Option
You can change your app’s domain management option by updating the app spec.
If you originally set up your domain with a CNAME pointer and want DigitalOcean to manage your app’s domain instead, add the zone field to the spec and use your domain’s name as the value. For example, the following spec adds the domain example.com to the app.
example-app-spec.yamlalerts:
- rule: DEPLOYMENT_FAILED
domains:
- domain: example-app.com
type: PRIMARY
zone: example.com
features:
- enable-kata-build
name: example-app-name
region: nyc
...This means that DigitalOcean will manage the domain’s name servers and DNS records going forward.
If DigitalOcean already manages your app’s domain and you want to self-manage it instead, remove the zone field, and follow the instructions to add a CNAME record to your domain.
Use Subdomain Routing
Components can support multiple domains and multi-tenancy using optional prefix-based routing. You can configure subdomain routing and edit the app’s default subdomain in the control panel or by updating the app spec.
Go to the Apps page, click your app, then click the Networking tab. In the Component routing rules section, click Add routing rule.

Use the settings in the Add a component routing rule dialog to configure subdomain routing:
-
Select domain to route requests from: Select a domain or select Match all incoming domains.
-
Route path: Enter a path to match only certain URLs (for example,
/api/), or leave it blank (or/) to match all requests. -
Path handling: Select Preserve Full Path, so the component receives the original URL.
-
Target component: Select the component to route requests to.
-
Configure CORS: Optionally customize CORS response headers if the subdomain is accessed from a different origin (for example, multi-tenant frontends, dashboards, or browser-based APIs). The options are:
- Access-Control-Allow-Origins: Specify which origins can make requests.
- Access-Control-Allow-Methods: Specify which HTTP methods are allowed.
- Access-Control-Allow-Headers: Specify which request headers clients can send.
- Access-Control-Expose-Headers: List which response headers browsers are allowed to expose to JavaScript.
- Access-Control-Max-Age: Define how long browsers can cache preflight results.
- Access-Control-Allow-Credentials: Allow cookies, auth headers, and other credentials in cross-origin requests.
-
Click Add routing rule to save.
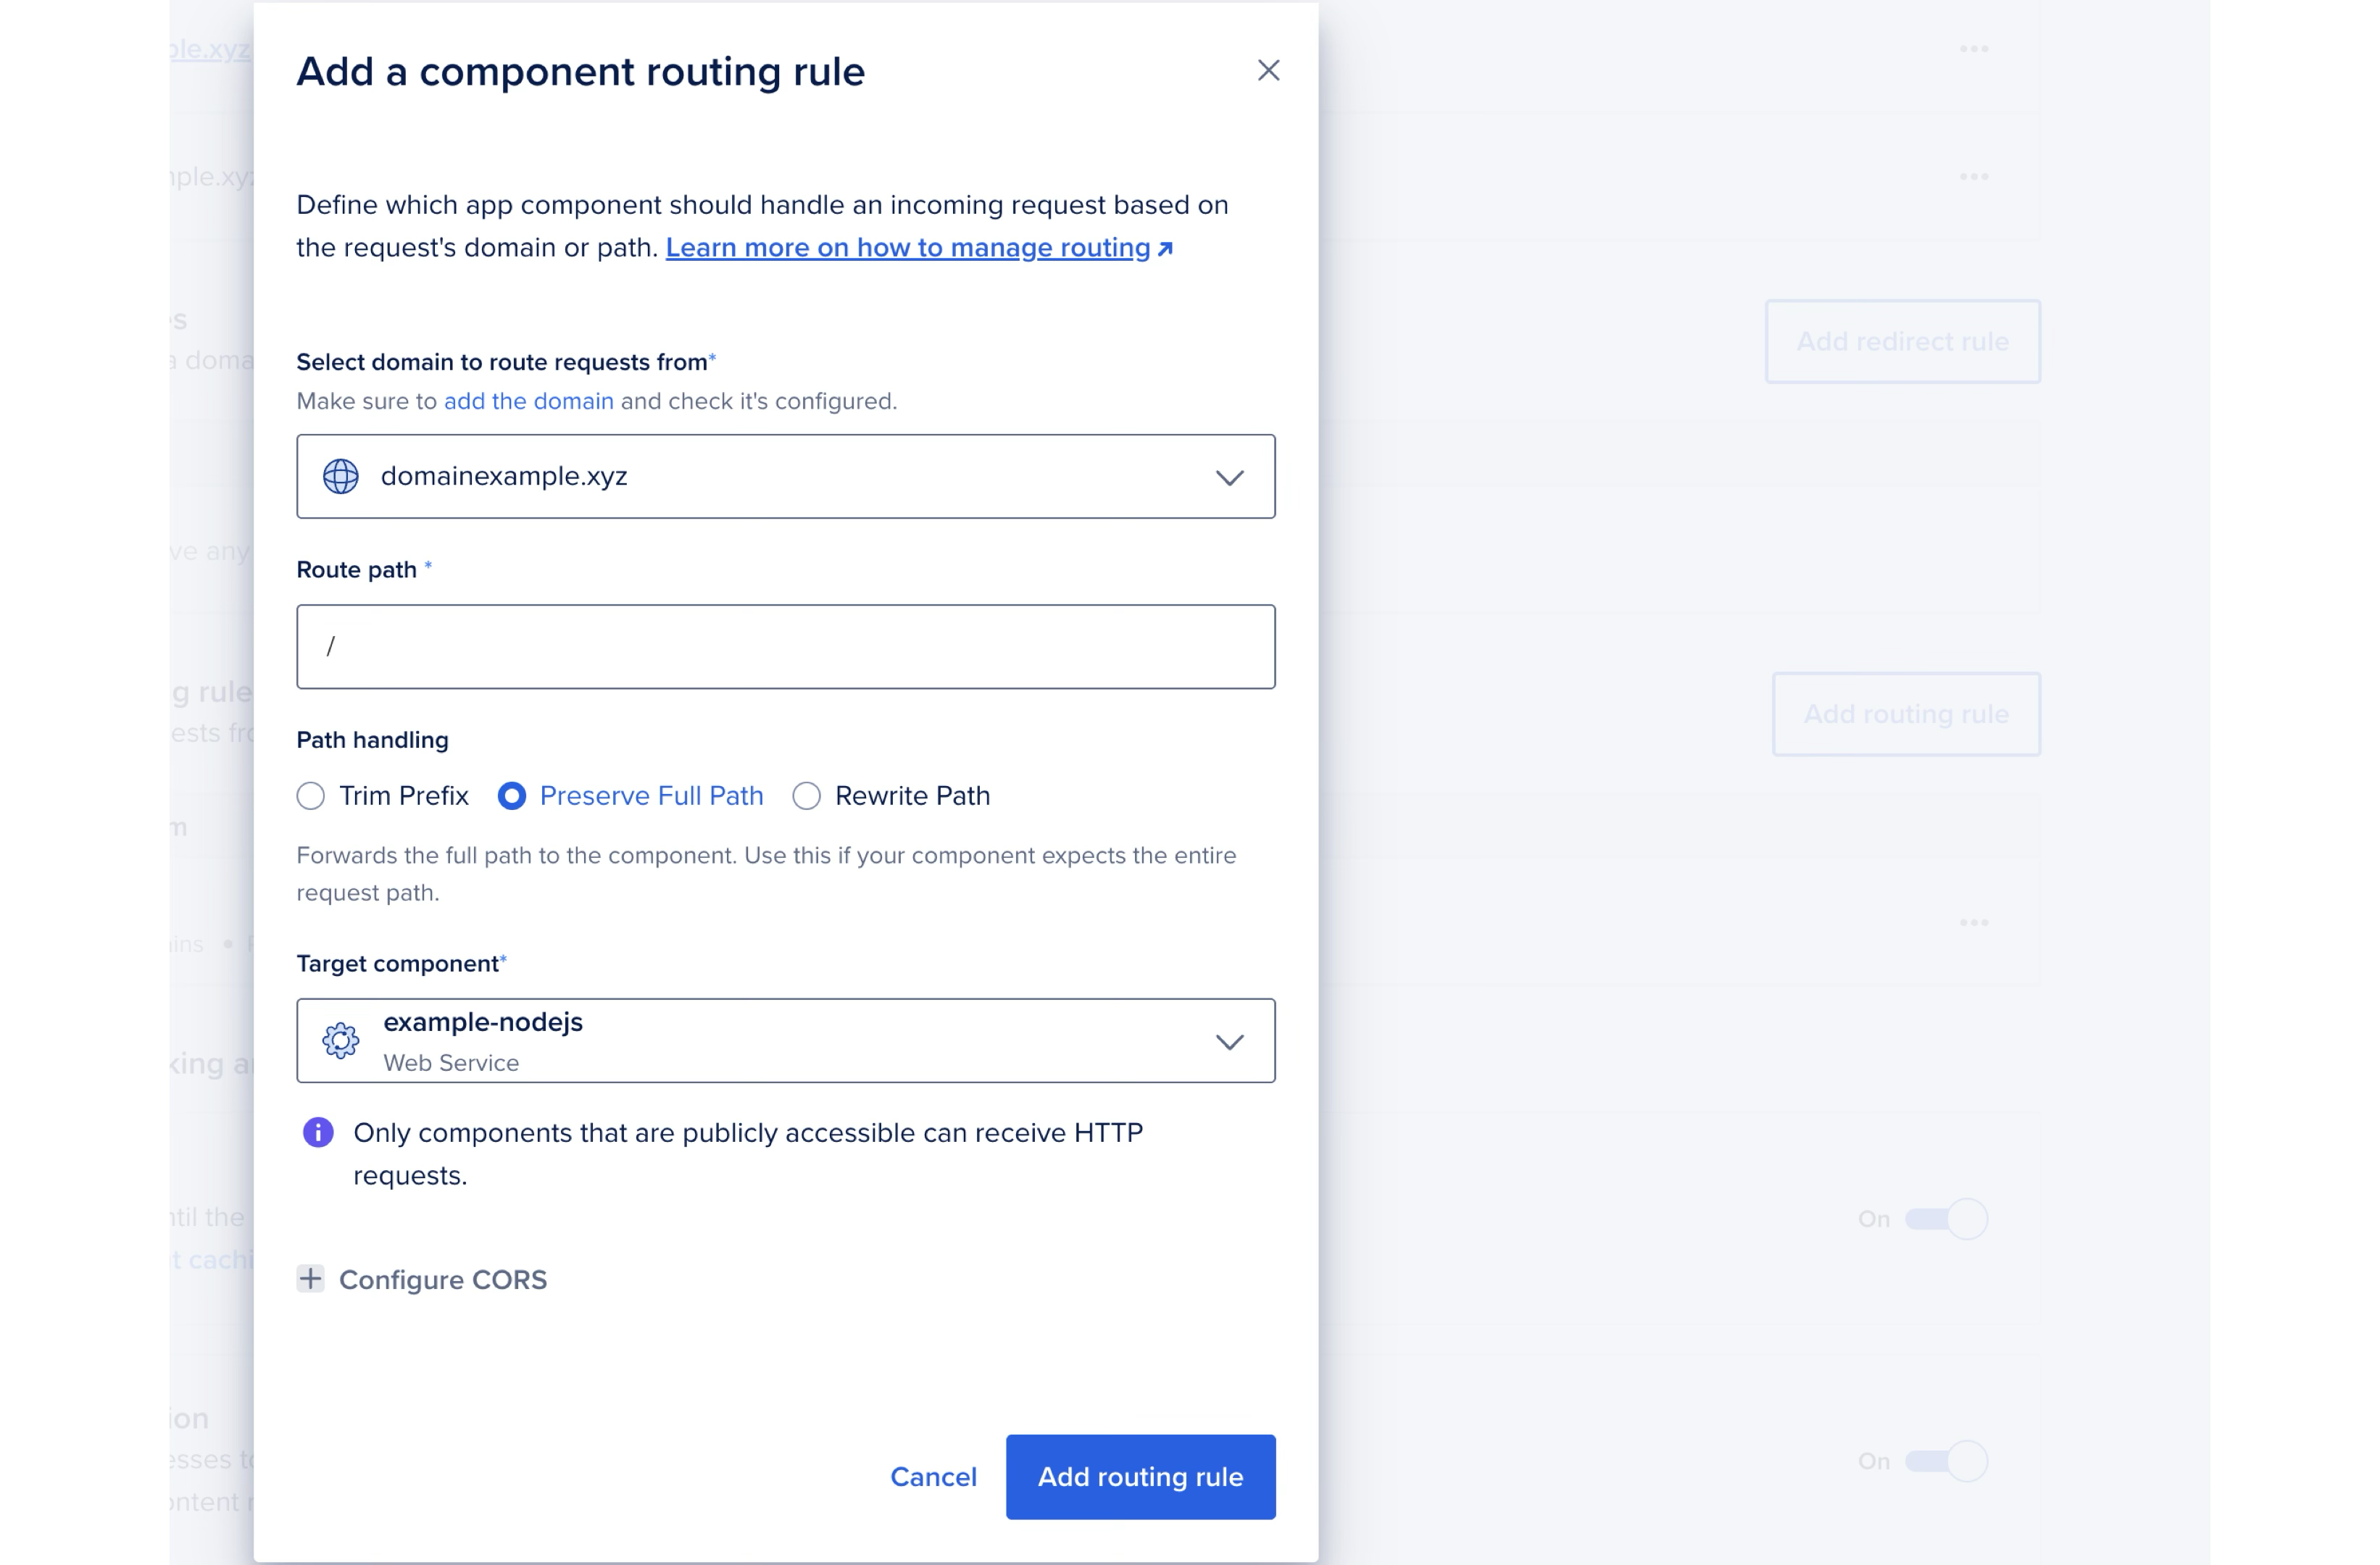
The image above shows a routing rule that directs all requests from the domain domainexample.xyz to the example-nodejs component. The browser URL remains unchanged. All paths are preserved, so a request such as /dashboard/settings reaches the component exactly as /dashboard/settings.
To add multiple subdomains, create a separate component block for each one. You can’t use wildcard domains in the subdomain routing block. See the following app spec example.
example-app-spec.yaml# Custom domain is *.example.com
domains:
- domain: example.com
type: PRIMARY
wildcard: true
zone: example.com
ingress:
rules:
# Traffic to https://api.example.com/v1 goes to the legacy API component
- component:
name: api-legacy
match:
authority:
exact: api.example.com
path:
prefix: /v1
# Traffic to https://api.example.com/v2 goes to the new API component
- component:
name: api
match:
authority:
exact: api.example.com
path:
prefix: /v2
# All other traffic goes to the frontend component
- component:
name: frontend
match:
path:
prefix: /
# Traffic to starter domain is redirected to app's custom domain
- redirect:
authority: example.com
match:
authority:
# The static placeholder ${STARTER_DOMAIN} matches on the app's starter domain
exact: ${STARTER_DOMAIN}Add a Domain that Uses CAA Records
App Platform supports LetsEncrypt and Google Trust as Certificate Authorities (CAs).
If you want to add a domain to App Platform that uses Certification Authority Authorization (CAA), you must add both letsencrypt.org and pki.goog to your domain’s CAA DNS record. If you do not specify both CAs, the custom domain configuration may fail.
Once you have specified both CAs in the domain’s CAA record, add the domain in App Platform following the custom domain instructions. App Platform validates the CAA record and issues certificates from one of the CAs.
Remove a Custom Domain
Before deleting an app, remove all custom domains. If a domain is not removed, it may continue pointing to the deleted app for up to 24 hours, making the domain unavailable for use with a new app until DNS updates.
To remove a custom domain, go to the Apps page, click your app, then click the Networking tab. In the Domains section, click … beside the domain, then click Remove domain.